FAQ (Frequently Asked Questions)
Please take a moment to read this page before requesting support.
- The quickest way to get support if needed is write to customer service.
- Are you New to Karaoke and not sure what disc you should be buying for the product you purchased?
Connecting to your TV
How do I connect to my TV?
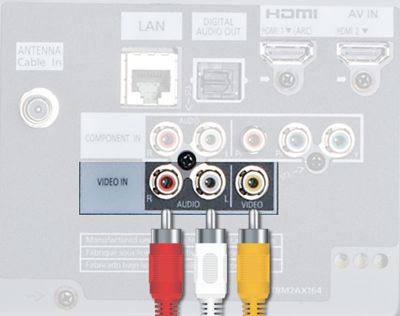
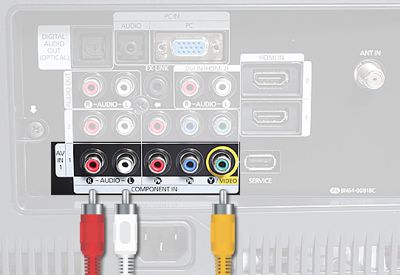
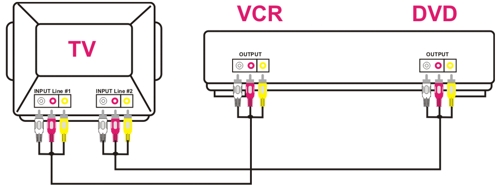
Most, if not all, TV's made prior to the past couple years should have the traditional RCA Red, White, Yellow input jacks. There should be an RCA cable with these colors included with your karaoke player. Simply connect the outputs on your karaoke machine to the TV's inputs while matching colors.
After connecting the cable, you MUST select the correct TV input channel associated with the TV RCA INPUT Ports. TVs are different. You will be looking for channels like: Line1, Line2, Aux, Aux1, Aux2, etc. You DO NOT want channel 2, 3, 4, 5, etc.
Most common connection. Connect the outputs on your karaoke machine to the TV's inputs while matching colors. |
If your TV does not have a yellow input jack, connect yellow cable to the green component input jack. |
 |
 |
Connecting an iPod
How do I connect an iPod to my player?
Your karaoke machine does not have a traditional iPod docking station and will not connect with a traditional iPod USB cable. The USB connection on the back of the player is for charging the iPod or personal player that can be charged through a USB cable. There is no data transfer using this USB connection.
The iPod or MP3 player is connected by using a cable that connects into the iPod or MP3 player's headphone jack and into the RCA (red & white) audio input connections on the back of the karaoke player. You can then hear your iPod music by selecting AUX on your karaoke player's function knob. If your iPod head phone jack has 3 bands, your iPod may have video capabilities on that same jack. By using a cable with red, white and yellow RCA ends, you may be able to take advantage of the video from your iPod onto the karaoke player's monitor, or your TV. Due to the many changes and generations of iPods and associative devices, this is something each user will have to research on their own. Many adaptor cables are available from Radio Shack or possibly Apple themselves. We cannot guarantee compatibility with any device.
Tech Support for Karaoke Products
| Having problems with one of these players? SD511SC, SD512, SD513, SD514 Don't understand how to download music or what an MP3.LRC format is? |
||
 |
 |
 |
 |
Quick tips that will help you resolve your problem(s). You will need to understand the type of cable(s) used on your existing DVD player and TV. Regardless of which you have or don't have, cables are provided in the product box to connect all devices. It will be necessary you match colors when connecting RCA cables. Yellow denotes video, red denotes audio right and white denotes audio left. When connecting to a DVD player, you will ALWAYS want the OUTPUT RCA Ports. When connecting to your TV, you will ALWAYS want your INPUT RCA Ports. |
 |
What product did you purchase?
Model numbers can be found above
the bar code on the rear of the box.
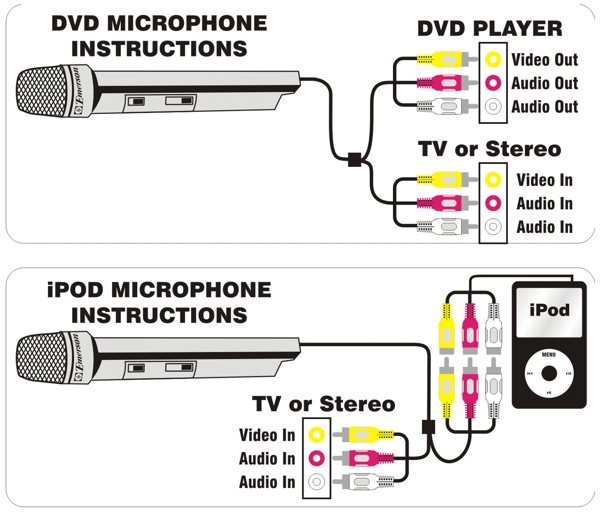
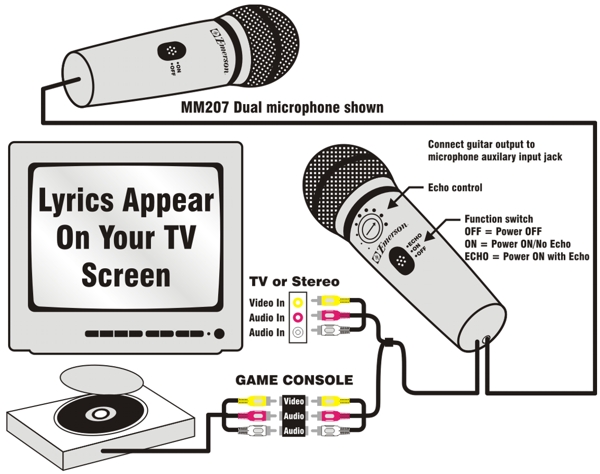
Plug N Sing Microphone, also known as DVD Microphone
Before you start, shut off any surround sound, satellite or enhanced audio equipment you may have. For the sake of testing all that must be removed from the connections. Connect directly into the TV. If you have a DVD recorder, you must connect to the DVD outputs on the BACK of the DVD player, not the front. The front jacks are inputs. Once you've found your microphone works, you can then experiment with connections to your other device. However, due to the wide variety of audio systems, we cannot lend technical support for these devices.
How is your DVD player connected to your TV?
- I'm smart, give me the condensed version.
- I have a DVD/TV Combo unit.
- DVD/VCR Combo player is connected directly to TV with RCA cables - No coax is connected to the DVD player.
- DVD/VCR Combo player is connected directly to TV with one coax cable - No RCA cables.
- DVD player is connected directly to TV with RCA cables - No coax is connected to the DVD player.
- DVD player is connected directly to TV with one coax cable - No RCA cables.
- Lord help me! I have Cable, Satellite, Surround Sound and maybe things I don't have a clue as to what they are.
I'm smart, give me the condensed version.
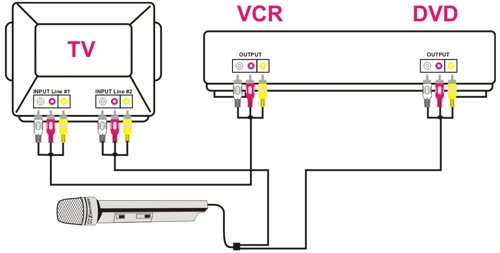
- Connect microphone's DVD RCA Cable end into the DVD Player's RCA OUTPUT Port
- Connect microphone's TV RCA Cable end into the TV's RCA INPUT Port
- Turn microphone on. Should see a red light. (Does not mean battery is good though)
- Grab TV Remote Control. Turn TV on. You MUST select the correct TV input channel associated with the TV RCA INPUT Ports. TVs are different. You will be looking for channels like: Video 1, Video 2, Line1, Line2, Aux, Aux1, Aux2, etc. You DO NOT want channel 2, 3, 4, 5, etc.
- If your microphone is equipped with a volume control, turn it up all the way.
- Turn TV volume higher than normal for testing. You do not need to play a disc to test microphone. Hold microphone to your lips and give a loud "check check check"
I did above steps and microphone does not work...
90% of all tech support calls for Plug N Sing Microphones are related to #4 and #6 above. You must be sure you have the proper TV INPUT channel selected. You must have the microphone volume (if available on your model) all the way up and the TV volume up higher than normal.
You cannot see the DVD disc on your TV screen. Make sure you are connected to the DVD OUTPUT RCA Ports. DVD/VCR Combo players or DVD's with record functions may have RCA input ports. Do not connect to DVD input ports if they exist. Also, when using a DVD/VCR Combo player, be sure you have opted to view the DVD disc and not the VCR side.
Your microphone only has red and white RCA cables. Some of the earlier models only had 2 cord ends to accommodate audio left and rights. Use your existing yellow RCA cable to connect between the DVD player and TV video RCA ports. If you don't have a yellow RCA cable handy, most any store selling electronics will have one. You may also contact us.
If still not successful, contact customer service.
I have a DVD/TV Combo unit.
Our Plug N Sing or DVD Microphones will not work with a DVD/TV Combo unit. For our microphones to function, we must connect between the DVD player and TV. DVD/TV Combo uNits are connected internally and connections are not accessible. However, you can use the DVD/TV Combo unit as either a DVD player or a TV and connect to another DVD player or TV to get the microphone to work properly.
DVD/VCR Combo player is connected directly to TV with RCA cables - No coax is connected to the DVD player.
- Please review the condensed version instructions above, then come back here.
- Trace your RCA cables connecting your DVD player to your TV.
- You are going to replace your RCA cables with the RCA cables on our microphone. Be sure to connect the DVD ends to the DVD player and likewise TV ends.
- Make sure your DVD/VCR is set to play DVD.
- Select the proper INPUT channel on your TV. This would be the same channel you would normally watch your DVD movies.
- Turn microphone and TV on. Turn up volumes. Give a loud 'check check check' into your microphone. You should hear your voice out the TV speakers.
If still not successful, contact customer service.
DVD/VCR Combo player is connected directly to TV with one coax cable - No RCA cables.
- Please review the condensed version instructions above, then come back here.
- Connect microphone's DVD RCA Cable end into the DVD Player's RCA OUTPUT Port.
- Connect microphone's TV RCA Cable end into the TV's RCA INPUT Port.
- Make sure your DVD/VCR is set to play DVD.
- Select the proper INPUT channel on your TV associated with the RCA INPUT Ports you selected on your TV.
- Turn microphone and TV on. Turn up volumes. Give a loud 'check check check' into your microphone. You should hear your voice out the TV speakers.
DVD player is connected directly to TV with RCA cables - No coax is connected to the DVD player.
- Please review the condensed version instructions above, then come back here.
- Trace your RCA cables connecting your DVD player to your TV.
- You are going to replace your RCA cables with the RCA cables on our microphone. Be sure to connect the DVD ends to the DVD player and likewise TV ends.
- Select the proper INPUT channel on your TV associated with the RCA INPUT Ports you selected on your TV.
- Turn microphone and TV on. Turn up volumes. Give a loud 'check check check' into your microphone. You should hear your voice out the TV speakers.
DVD player is connected directly to TV with one coax cable - No RCA cables.
- Please review the condensed version instructions above, then come back here.
- Connect microphone's DVD RCA Cable end into the DVD Player's RCA OUTPUT Port.
- Connect microphone's TV RCA Cable end into the TV's RCA INPUT Port.
- Select the proper INPUT channel on your TV associated with the RCA INPUT Ports you selected on your TV.
- Turn microphone and TV on. Turn up volumes. Give a loud 'check check check' into your microphone. You should hear your voice out the TV speakers.
Lord help me! I have Cable, Satellite, Surround Sound and maybe things I don't have a clue as to what they are.
- Electronics can be intimidating at times. Regardless, our microphones will still connect and work fine. If you have open (not used) DVD OUTPUT RCA Ports and open TV INPUT RCA Ports, that's all you need to get connected.
- If you don't have open RCA OUTPUT and INPUT Ports, it will be necessary you temporarily disconnect whatever device(s) to open the ports, then connect our microphone.
- Note: we cannot respond to tech support issues where you have decided to keep your surround sound or other devices in the loop. Such connections can be problematic for troubleshooting. It's best to only experiment after you have confirmed a simple connection works.
- Please review the condensed version instructions above, then come back here.
- Connect microphone's DVD RCA Cable end into the DVD Player's RCA OUTPUT Port.
- Connect microphone's TV RCA Cable end into the TV's RCA INPUT Port.
- Select the proper INPUT channel on your TV associated with the RCA INPUT Ports you selected on your TV.
- Turn microphone and TV on. Turn up volumes. Give a loud 'check check check' into your microphone. You should hear your voice out the TV speakers.
If still not successful, contact customer service.
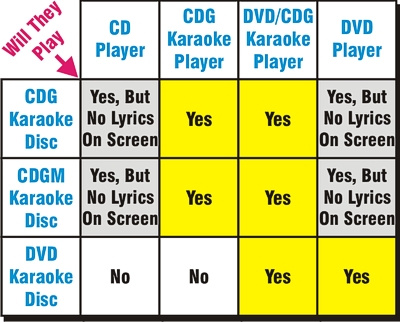
New to Karaoke?
- Generally, there are 3 types of karaoke discs: CDG, CDGM (Multiplex) and DVD
- CDG has no Lead vocals on the disc.
- CDGM will have 2 versions of the same songs. One with lead vocals, one without lead vocals.
- DVD discs may or may not have lead vocals. It depends on the manufacturer.
- CDG/CDGM discs will play in most CD and DVD players, but you will not be able to see lyrics on your TV screen. To see lyrics, you must have a CDG Karaoke machine.
- Some DVD players may be karaoke compatible and will play CDG discs. Most DVD players purchased through normal retail are not karaoke compatible. Check your manual before purchasing discs.
- DVD Karaoke discs will not play in a CDG Karaoke machine. They will however play in a karaoke DVD player or normal household DVD player.
The chart to the right may be useful in determining what karaoke discs to purchase. Generally, if you have a DVD Microphone and wish to play karaoke on your home DVD player, buy DVD karaoke discs. If you have a karaoke player that is not DVD compatible, you will want to purchase CDG or CDGM karaoke discs. These discs are available on the following website: |
 |
Sample connection configurations

SD511SC, SD512, SD513 and SD514 MP3.LRC Karaoke Players
|
|
|
What is MP3.LRC?
MP3.LRC is no more than 2 files with the same filename (different extensions). One file being an MP3 file format is the same MP3 music files you've been listening to for years. They are available for downloading all across the internet. The LRC file is the lyric file that contains the words to your music. It is formatted as a normal text file that can be opened and manually edited with notepad. Inside the file, there's timing tags that define when the next line of lyrics is going to be displayed. Although a person can manually create an LRC file, it's much easier to use an LRC creator program found on the internet.
How do I get my MP3.LRC music on my player?
Copy both your MP3 and LRC files onto an SD Card, insert the SD Card into your player, turn the player on, navigate to the SD Card and you'll see a menu of your songs. Select a song and play it. Your MP3.LRC player will always play MP3 music files whether you have an LRC (lyric) file or not. However, if there happens to be an LRC file present, with the exact same filename (different extension) it will cue the two files to play in sync with each other. So, as the music plays, the lyrics will be displayed on your player's screen.
How do I delete the songs on the player and replace with my own songs?
Models SD512 and HD515 have the capability of connecting to your computer and showing up in Windows (not Mac) as an external HDD. You can then delete the songs and use the Song Transfer Program to install new songs.
The SD511SC, SD513 and SD514 players have songs built-in to the players and they cannot be deleted. Nor can you add songs to the internal storage chip. To add more songs, use your computer to copy songs onto an SD Card, then insert the SD Card into the players and play your selections.
How do I download songs?
Visit SingTheHits.com. DO NOT CALL TECH SUPPORT FOR HELP WITH DOWNLOADING! Due to everyone's computer being setup differently and add to that the wide variety of user skills, this is not something we cannot sit on a phone and explain. We are happy to help you with any player issues. Downloading is not a player issue. It's a user or computer issue.
Still having problems? Please write to customer service.